Building 3 Responsive Real World Website Using HTML5, CSS3, JS, And Bootstrap 4
Planing
- Expected time: 59 hours
- Finish day: 20/08/2018
- Study Plan
Day 1: 12/08/2018
Today’s progress
Finish lesson 1: Why this Course and Course plan
- Get the purpose of the course
- List out overall content for the course
Finish lesson 2: Editor
- Choose for yourself an IDE( VS Code as the course suggested)
- Discover some built-in features of VS Code
- Install some package for VS Code
Finish lesson 3: Adobe Photoshop Essentials
- How to convert a PSD to a full working website
- Explain photoshop tools
Thoughts
- Struggle with Git a little bit.
- The documentation is more time-consuming than expected.
- Spend some time on markdown hyperlink
- The markdown preview of VSCode show wrong indentation.
- Markdown show up in gitlab and atom differently which blocks
- The lesson is like a walk in the park not as hard as i expected
Day 2: 13/08/2018
Today’s progress
Finish lesson 4: Bootstrap 4
- Discuss some of the neccessary and most used bootstrap components and ultilities
Thoughts
- Phew, Pretty long documentation
- The video is a bit hard to listen
Links to work
Day 3: 14/08/2018
Today’s progress
Finish lesson 5: Preprocessors SASS vs LESS
- Find out what is SASS and LESS, why use them and give some examples
Thoughts
- A little confusion comes from the naming of Sass and Scss.
- The
yarn global add node-sassdoes not work, usenpm install node-sass -ginstead
Links to work
Day 4: 15/08/2018
Today’s progress
Finish lesson 6: Trello The Project Manager
- What is Trello and why it’s helpful
- How to use
Finish lesson 7: OpenCharity Overview
- An overview on the website that we are going to clone
Finish lesson 8: Prepare files
- Build project folder structure
- Convert PSD file to some neccessary assets
- Integrate Bootstrap 4
Finish lesson 9: Linking Files + Implement Style Sheet
- Link CSS and JS files to index.html
- Implement CSS of our own with less
Thoughts
- The Trello lesson is easy.
- Finding fonts and download them for free is time-consuming
- The photoshop move tool does not work properly, so inpecting elements to export struggle a bit, attempting to fix it.
- Lesson 9 is plain coding with no explaination or visual comparision
Links to work
Link to GitHub Project: OpenCharity
Day 5: 16/08/2018
Today’s progress
Finish lesson 10: Navbar Part 1
- Implement styles for Navigation Bar
Finish lesson 11: Navbar Part 2
- Implement event-handlers for Navigation bar
Finish lesson 12: Header Part 1
- Implement page header sections
Finish lesson 13: Header Part 2
- Finish page header sections
Finish lesson 14: Get Involved Section
- Implement UI for GET INVOLVED Section
Thoughts
- Just mirror coding without any further explaination
Links to work
Link to GitHub Project: OpenCharity
Day 6: 17/08/2018
Today’s progress
Finish lesson 15: Mission Section
- Implement UI for Mission Section
Finish lesson 16: Members Section
- Install Owl Carousel 2
- Implement UI for Member Section
Finish lesson 17: Event Section
- Implement UI for Event Section
Finish lesson 18: Blog Section
- Implement UI for Blog Section
Finish lesson 19: Contact Section and Footer
- Implement UI for Contactc Section
- Implement UI for Footer
Finish lesson 20: Enhancements
- Add animation, fix responsive bugs, make changes to UI
Finish lesson 21: Testing
- Cover some remaining issues about UI, animation,..
- Increase website performance
- Do some testing
Thoughts
- Just mirror coding
Day 7: 18/08/2018
Today’s progress
Finish lesson 22: Recap
- Review what we have built
Finish lesson 23: 404-Overview
- Prepare for the 404-penguins-page
Finish lesson 24: Prepare Files
- Build project folder structure
- Extract neccessary images from psd file
- Import in neccessary css.
Finish lesson 25: Start Code
- Implement UI
- Styling Page
- Add animation
Finish lesson 26: Recap
- Advices on project
Finish lesson 27: Merkury Overview
- Overview on what are we going to build
Finish lesson 28: Prepare Files
- Apply Trello steps
Finish lesson 29: Linking Files
- Link image and library with index.html
- Apply some custom CSS
Thoughts
- Spend some time on Trello stuffs
Day 8: 19/08/2018
Today’s progress
Finish lesson 30: Navbar Part 1
- Implement styles for Navigation Bar
Finish lesson 31: Navbar Part 2
- Add some enhancements to make our navbar more interactive
Finish lesson 32: Header
- Implement UI for page header section
Finish lesson 33: Service Section
- Implement UI for service section
Finish lesson 34: Features Section
- Implement UI for Features section
Finish lesson 35: Drag and Drop Section Part 1
- Implement Skeleton for Drag and Drop section
Finish lesson 36: Drag and Drop Section Part 2
- Implement Style for Drag and Drop section
Finish lesson 37: Template Section
- Implement UI for Template Section
Finish lesson 38: Pricing Section
- Implement UI for Pricing Section
- Remind of Box shadow CSS
Finish lesson 39: Join and Footer Section
- Implement UI for Join Section
- Implement UI for Footer Section
- Remind of
:before,:afteranddisplay: flex
Thoughts
- Problem with git pushing, SSH key added but still require manually Authentication, pushing takes too much time, fail sometimes
- The course does not go into details of CSS keyframe, jQuery and jQueryUI, just mention syntaxes and some functionalities. Research on them later on.
Day 9: 20/08/2018
Today’s progress
Finish lesson 38: Pricing Section
- Implement UI for Pricing Section
- Remind of Box shadow CSS
Finish lesson 39: Join and Footer Section
- Implement UI for Join Section
- Implement UI for Footer Section
- Remind of
:before,:afteranddisplay: flex
Finish lesson 40: Enhancements
- Make website more responsive
- Apply some effect to increase smoothness
Finish lesson 41: Testing
- See what can we improve
Finish lesson 42: Recap
- Revise what we have learnt so far
Finish lesson 43: Important Tips
- Share some important tips and advices
Thoughts
- Problem with git pushing, SSH key added but still require manually Authentication, pushing takes too much time, fail sometimes
- The course does not go into details of CSS keyframe, jQuery and jQueryUI, just mention syntaxes and some functionalities. Research on them later on.
- More stuffs to research:
flexbox,box-shadow, psuedo classes CSS - The guideline on Scroll Reveal section is outdated
- The deployment and image compressing and speed test take freaking long time
Day 10: 26/08/2018
Some tips on front-end developments:
Folder structure
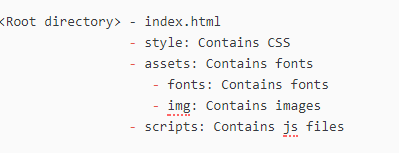
Step to convert PSD to HTML and CSS
- Build html files first.
- Inspect color, font size, spacing
- Convert font-size, color, spacing to CSS
- Add animation, effects
Thoughts
- Add CSS to ensure color and spacing need 1 to 1 precision.
Day 11: 29/08/2018
Config build tools and Steps to create skeleton HTML
New folder structure
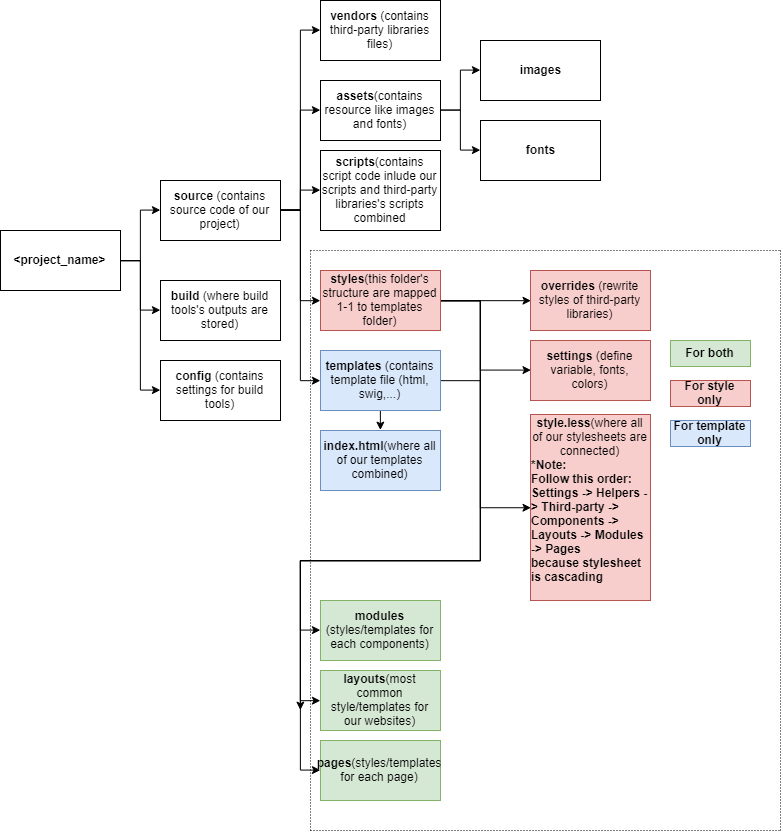
Note:
The index.js in scripts folder should import style.less
The style.less should include banner, like:
/_ Open Charity style _/
Tips on setting up Build tools
Webpack
Should hash output filename after build to support auto clearing cache at client
Gulp
Steps to install
- Create
gulpfolder andgulpfile.js - Install gulp
yarn add gulp --ignore-engines - Install
require-dir - Config
gulpfile.js
- gulp/util.js: for logging
- gulp/concat.js: concat files
- gulp/gulp-size.js: Alert file size after build
Note
Gulp’s tasks naming:
For development: scripts:vendor:compile
For production: Add prefix production
Create Skeleton HTML
Prepare resource:
- Open design file with Photoshop
- Resize PSD file if it’s too large using Image/Image Size…
- Extract color, fonts and images and note down/save them
Connect resource to our project
With fonts
Always include all font type : oet, woff, ttf for cross-browser support
Suggest fontsquirrel to generate font kit from one file type
The font kits from internet usually include demo document, use their css to quickly define fonts
With color
Use chir.ag to name color and turn colors into less variables
Define color class for text and background
- Text: .text-
<
color_name> - Background: .bg-
<
color_name>
With image
Rename them to describe where they would be used in website
Naming convention: Using _ to separate words, __ to represent child component
Ex: Image used for item 2 of section 2: section_1__item_2.png
Writting HTML
Name class and id right:
With class
Follow Semantics UI: primary button, facebook item, facebook item-1
With ID
Use _ to separate words and ** to represent child components: `footer**social_links`
Note
- Class and ID should be used mixed.
- Classes are used for common styling, describing component
- IDs are used for quicker queries.
- Writing HTML should avoid over thinking
Day 12: 07/09/2018
Today’s progress
Perfect pixel website without resizing design file
Front-end tips and tricks
Introduce some linting tools and optimize tools
Details
Perfect pixel website without resizing design file
Scale down screensize for fitting PSD file better
Front-end tips and tricks
How to use padding and margin properly:
- Padding should be used for nesting containers
- Margin should be used for adjusting spacing between elements
- Margin must not be used together with position
- Tag containing background should be put on top of its container
How to use button and a tag with class button properly:
awith classbuttontags should be used for navigatingbuttonshould be used for form and action only
Naming convention update:
.listshould contain.item.rowshould containcolumn- Avoid abbreviations to keep template semantic.
Introduce some linting tools and optimize tools
Some linting tools to be applied in near future:
- ESlint
- CSSlint
- Husky + lint-staged
Linting configuration file: .editorconfig
Some linting tools for reference:
- prettier
Optimizing tools to be applied:
- Minify CSS.
- Minify JS
- Minify HTML (experimenting)
Some Optimizing tools for reference:
- prepack.io (developing)
Day 13: 12/09/2018
Today’s progress
Naming convention update
Front-end tips and tricks
Some strays on the modern web design world
Introduce some web optimization techniques
Introduce regression test
Details
Naming convention update
Vocabularies:
Classes:
.title (For section, for card),
.content(For section),
.description(Esp for card),
.meta(Additional information, use with descriptive classes like time, date, price, discount, wrapped with <span>),
.action(For button),
.thumbnail
.row > .column,
.list > li.item
Front-end tips and tricks
New rules:
- Restrict on using
.container-fluid, using.containerand override@container-md,@container-sm,@container-sm - Using css
classfor defining fonts - Color and background color class pattern:
color-[color-name],background-[color-name] - Bootstap
.rows should be only applied to.row > .columns - Font’s filename:
"Font-Name.[ext]" - font-family define:
'Font Name' - Using CSS over JS creating animations
Template structure:

Some strays on the modern web design world
Avoid FOUT, FOIT, FOFT
Some popular Design Systems
- Bootstrap
- Zurb Foundation
- Semantic UI
States of digital websites
- Full (Interacting)
- Loading (Interacting)
- Error
- Error
- Empty
- Edge cases
Introduce some web optimization techniques
With Javascript
- Minify JS
- Obfuscate JS (encode to avoiding reversing)
With CSS
- Minify CSS
- Critical CSS (determine some important CSSes to be applied before all CSSes are loaded to create
First meaningfull paint) - Remove unused CSS using
With HTML
- Minify
With Images and fonts0
- Compress images and fonts
Introduce regression test
Apply regression test and its importance in frontend development
Day 14: 3/10/2018
Front-end Tips and Tricks
Understand Webpack
Sample project: Merkury Dashboard
A config file are required: /config/webpack/config.js
const appRootDir = require('app-root-dir').get();
const path = require('path');

// Includes all your webpack bundles in the body using script tags
// support template loading
const HtmlWebpackPlugin = require('html-webpack-plugin');

// Make sure some asset is include in the output of HtmlWebpackPlugin
const HtmlWebpackIncludeAssetsPlugin = require('html-webpack-include-assets-plugin');

// Copies individual files or entire directories to the build directory
// Simple pattern { from: 'source', to: 'dest' }
const CopyWebpackPlugin = require('copy-webpack-plugin');

// This plugin extracts CSS into separate files
// It creates a CSS file per JS file which contains CSS
// It supports hot reloading (HRM) of CSS and SourceMaps.
const MiniCssExtractPlugin = require('mini-css-extract-plugin');

// Search for CSS assets during the Webpack build
// and will optimize \ minimize the CSS (by default it uses cssnano)
const OptimizeCssAssetsPlugin = require('optimize-css-assets-webpack-plugin');

// Require by OptimizeCssAssetsPlugin
const cssnano = require('cssnano');

// ADD SOME TOOLS FOR MAKING webpackConfig more declarative:
// getIfUtils, removeEmpty (remove undefined object)
const { getIfUtils, removeEmpty } = require('webpack-config-utils');

const { ifProduction, ifDevelopment } = getIfUtils(process.env.NODE_ENV);

const BUILD_DIR = path.resolve(appRootDir, 'build');
const APP_DIR = path.resolve(appRootDir, 'source');

const webpackConfig = removeEmpty({
  // Modes, required by webpack 4
  mode: ifProduction('production', 'development'),
  context: appRootDir,
  // where the webpack start crawling to figure out which files to be
  // bundled up
  entry: [
    './source/scripts/index.js',
  ],
  // Hashing is supported by HtmlWebpackPlugin
  output: {
    path: BUILD_DIR,
    filename: '[name].[hash].js',
    publicPath: ifDevelopment('/'),
  },
  // spit out error or warning about performance-related issues
  // Ex: image with large size...
  performance: {
    hints: ifProduction('warning', 'warning'),
    // hints: ifProduction(false, false),
  },
  // A source map provides a way of mapping code within a compressed file
  // back to it’s original position in a source file => easier to debug
  devtool: 'source-map',
  // Define loader used for specific file types
  module: removeEmpty({
    rules: removeEmpty([
      {
        test: /\.(js|jsx)$/,
        exclude: /(node_modules|vendors\.js)/,
        use: [{
          loader: 'babel-loader',
          options: {
            cacheDirectory: true,
          },
        }],
      },
      {
        test: /\.html$/,
        exclude: /node_modules/,
        use: ['html-loader'],
      },
      // MiniCssExtractPlugin should be used without style-loader
      {
        test: /\.css$/,
        use: [
          ifProduction(MiniCssExtractPlugin.loader, 'style-loader'),
          'css-loader?modules',
        ],
      },
      {
        test: /\.less$/,
        use: [
          ifProduction(MiniCssExtractPlugin.loader, 'style-loader'),
          'css-loader',
          'less-loader',
        ],
      },
      {
        test: /\.woff2?(\?v=\d+\.\d+\.\d+)?$/,
        loader: 'url-loader',
        options: {
          limit: 10240,
          mimetype: 'application/font-woff',
        },
      },
      {
        test: /\.ttf(\?v=\d+\.\d+\.\d+)?$/,
        loader: 'url-loader',
        options: {
          limit: 10240,
          mimetype: 'application/octet-stream',
        },
      },
      {
        test: /\.eot(\?v=\d+\.\d+\.\d+)?$/,
        loader: 'file-loader',
      },
      {
        test: /\.svg(\?v=\d+\.\d+\.\d+)?$/,
        loader: 'url-loader',
        options: {
          limit: 10240,
          mimetype: 'image/svg+xml',
        },
      },
      {
        test: /\.(gif|jpg|png|ico)(\?.*$|$)$/,
        loader: 'file-loader',
      },
      {
        test: /\.swig$/,
        use: [
          'extract-loader',
          `html-loader?${JSON.stringify({
            attrs: ['img:src', 'link:href', 'source:src'],
            minimize: false,
          })}`,
          'swig-loader',
        ],
      },
      {
        test: /jquery\/src\/selector\.js$/,
        loader: 'amd-define-factory-patcher-loader',
      }, {},
    ]),
  }),
  // How webpack identify path to modules
  resolve: {
    modules: [
      'node_modules',
    ],
    extensions: ['.json', '.js', '.jsx'],
  },
  // What information to show when build run
  stats: {
    assets: false,
    cached: false,
    cachedAssets: false,
    colors: true,
    version: false,
    hash: true,
    timings: true,
    chunks: false,
    chunkModules: false,
    entrypoints: false,
    modules: false,
  },
  // Init plugin objects
  plugins: removeEmpty([
    new CopyWebpackPlugin([{
      from: 'source/scripts/vendors.js',
    }]),
    new HtmlWebpackPlugin({
      // template: './source/templates/index.swig',
      title: 'Merkury Dashboard',
      filename: 'home.html',
      template: `${APP_DIR}/templates/pages/home.swig`,
    }),
    // new AddAssetHtmlPlugin({ filepath: path.resolve(APP_DIR, 'source/scripts/vendors.js') }),
    new HtmlWebpackIncludeAssetsPlugin({
      assets: ['vendors.js'],
      append: false,
      hash: true,
    }),
    ifProduction(new MiniCssExtractPlugin({
      filename: '[name].[hash].css',
      chunkFilename: '[id].css',
    })),
    ifProduction(new OptimizeCssAssetsPlugin({
      cssProcessor: cssnano,
      cssProcessorOptions: {
        discardComments: {
          removeAll: true,
        },
      },
      canPrint: false,
    })),
  ]),
});

module.exports = webpackConfig;
Remmember to install all required plugins and loaders
Gitlab CI with Surge autodeploy integration
Step 1: Create a .gitlab-ci.yml
Step 2: Update .gitlab-ci.yml
# requiring the environment of NodeJS 8.9.x LTS (carbon)
image: node:8

# add 'node_modules' to cache for speeding up builds
cache:
  paths:
  - node_modules/ # Node modules and dependencies

before_script:
# The project use bower also
- npm install --global bower
- yarn install

# allow-root option for execute command with sudo
- bower install --allow-root

# Minify vendors.js using gulp
- ./node_modules/.bin/gulp production:scripts:vendors:compile


preview:
  stage: deploy
  variables:
    # Define env Variable for Gitlab
    NODE_ENV: "production"
  script:
  - npm install --global surge
  - ./node_modules/.bin/webpack --config ./config/webpack/config.js
  - surge -p build/ --domain nappy-friend.surge.sh
  except:
  - master
  artifacts:
    paths:
    - build
Note: Surge auto deploy require authetication, so add SURGE_LOGIN(value: your surge email) and SURGE_TOKEN(achive by running surge token) to gitlab Secure variables(Project Settings -> CI/CD -> Variables)
Setup Docker
You need three files:
docker-compose.yml
Define context to run build
version: '3.2'

services:
  docs:
    build:
      context: .
    tty: true
    volumes:
    - ./:/code
Dockerfile
Define docker image to use, setup container
FROM mkenney/npm
RUN mkdir /code
WORKDIR /code
ADD . /code
.dockerignore
Define directories not to be wrapped in container
node_modules
build
..... Some thing more ........
Build command: docker-compose build to construct docker container
Get container’s name: docker-ps
SSH to container shell: docker exec -it <container_name> bash
Day 15: 4/10/2018
Front-end Tips and Tricks
Practical project: linkedbooster.app-1
Bower with gulp vendor.js compiling:
bower config:
{
  "directory": "source/vendors/",
  "scripts": {
    "postinstall": "gulp scripts:vendors:compile"
  },
  "storage": {
    "packages": ".bower/packages",
    "registry": ".bower/registry",
    "links": ".bower/links"
  },
  "tmp": ".bower/tmp",
  "strict-ssl": false
}
bower.json
{
  "name": "linkedbooster.app-1",
  "description": "",
  "main": "index.js",
  "authors": [
    "Duy Pham<duy@passcareer.io>"
  ],
  "license": "MIT",
  "homepage": "",
  "private": true,
  "ignore": [
    "**/.*",
    "node_modules",
    "bower_components",
    "source/vendors/",
    "test",
    "tests"
  ],
  "dependencies": {
    "jquery": "^3.3.1",
    "font-awesome": "4",
    "scaleapp": "^0.4.3"
  },
  "overrides": {
  }
}
gulp config:
/gulp/tasks/scripts.js
'use strict';

var gulp = require('../gulp.js'),
    gutil = require('gulp-util'),
    mainBowerFiles = require('main-bower-files'),
    notifier = require('node-notifier'),
    concat = require('gulp-concat'),
    removeComma = require('gulp-trailing-comma'),
    size = require('gulp-size'),
    uglify = require('gulp-uglify'),
    rename = require('gulp-rename')
;

var sizeOptions = {
    showFiles: true
};

gulp.task('scripts:vendors:compile', function(){
    return gulp
        .src(mainBowerFiles({
            filter: ['**/*.js']
        }))
        .pipe(concat('vendors.js'))
        .pipe(removeComma())
        .pipe(size(sizeOptions))
        .pipe(gulp.dest(config.paths.relative.sourceScripts))
        .on('end', function(){
            notifier.notify({message: 'Compile vendors packages successfully'});
            gutil.log(gutil.colors.green('Compile vendors packages successfully'));
        })
});

gulp.task('production:scripts:vendors:compile', function () {
    return gulp
        .src(mainBowerFiles({
            filter: ["**/*.js"]
        }))
        .pipe(size(sizeOptions))
        .pipe(concat('vendors.js'))
        //remove commas
        .pipe(removeComma())
        .pipe(uglify())
        .pipe(gulp.dest(config.paths.relative.sourceScripts))
        .pipe(size(sizeOptions))
        ;
});
gulp/config.js
var config = require('../config.json');

config.paths.absolute = {};

//generate absolute paths from relative ones
for(key in config.paths.relative){
    config.paths.absolute[key] = __dirname + '/../' + config.paths.relative[key];
}

//prepend path to browserSync files filter
for(key in config.server.browserSync.files){
    config.server.browserSync.files[key] = config.paths.relative.build + '/' + config.server.browserSync.files[key];
}

module.exports = config;
gulp/gulp.js
var gulp = require('gulp'),
    plumber = require('gulp-plumber'),
    gutil = require('gulp-util')
;

var gulp_src = gulp.src;
gulp.src = function () {
    return gulp_src.apply(gulp, arguments)
        .pipe(plumber(function (error) {
                // Output an error message
                gutil.log(gutil.colors.red('Error (' + error.plugin + '): ' + error.message));
                // emit the end event, to properly end the task
                this.emit('end');
            })
        );
};

var gulp_watch = gulp.watch;
gulp.watch = function () {
    return gulp_watch.apply(gulp, arguments)
        .on('add', function (file) {
            gutil.log('File', file.path, 'has been added');
        })
        .on('change', function (file) {
            gutil.log('File', file.path, 'has been changed');
        })
        .on('unlink', function (file) {
            gutil.log('File', file.path, 'has been removed');
        })
        // More events.
        .on('addDir', function (file) {
            gutil.log('Directory', file.path, 'has been added');
        })
        .on('unlinkDir', function (file) {
            gutil.log('Directory', file.path, 'has been removed');
        })
        .on('error', function (error) {
            gutil.log('Error happened', error);
        })
        .on('ready', function () {
            gutil.log('Initial scan complete. Ready for changes.');
        })
}

module.exports = gulp;
Day 16: 7/10/2018
Front-end Tips and Tricks
- Gulp and Webpack
- The development process
- How to commit it right
Why Gulp and Webpack?
Frontend used to be server-side rendered
But gradually, the frontend became more complex, the codebase grew bigger, harder to manage => Raise the need for modulation (code separation), concatenation (connect piece of code after modulation) and minification (size down code base)
Then NodeJs was born:
Task runners appeared to solve these problems: 2 popular task runners at the time
- Grunt: Configuration over convention
- Gulp: Convention over configuration
Package managers: Manage your libraries
- npm
- bower
Task runners
Grunt - The old way
How it works ?
- You have a few less files
- You compile them to CSS
- Minify them
- Save them to disk
Gulp - The new generation
Powered by the Node Stream API
Node Stream API is well explained here
Gulp inherit the pipeline architecture, configuration uses pure javascript using node stream API
gulp.src.pipe(function() {})
.pipe(function() {})
.pipe(function() {})
.pipe(function() {})
.dest(function() {})
The processing is called composition, executed based on an AST tree of the source code. The composition concept is inherited by Surge, Netlify and React Redux also
AST tree crash course here
In Gulp 4, they introduced parallel pipe
A resembrance is Continuous Uploading/deployment
But, the codebase is not only about JS, it consists of lots of template and Stylesheets too. That’s why they invented module bundlers
Module Bundlers
There are 3 module bundlers with different approach that you should consider:
- Webpack
- Rollup
- Parcel
The comparison, strength and weakness of each can be found here
Notice:
- Webpack 4 has some problem when bundling package managed by bower.
- Two old bundlers: RequireJs and Browserify
Development process
- Build Dev Environment
- PSD to HTML Conversion
- Assure Responsiveness
- Optimization (Can be integrate with step 1)
- Deployment
Personal weakness: Improve look and feel, balance spacing between elements
When cloning
- Keep html structure intact
- Font, image, script, style folder should include a folder named ‘legacy’ to contain all files we copy
- Remember, sometimes third-party UI frameworks can override styles from legacy because they are always include first
How to commit it right
The commit should reach the standards below:
- At least contains verb
- Meaningful
- Transparent, avoid ambiguations